|
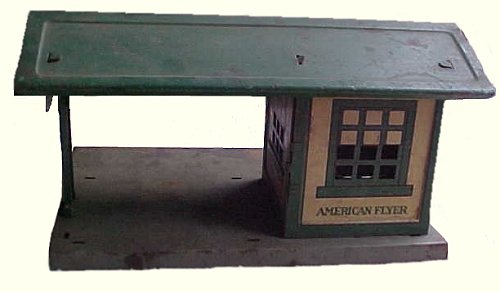
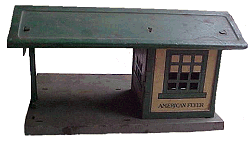 Editor's Note: In late 2009, Putz house collector "Papa Ted" Althof brought an old American Flyer way station to the attention of Florida hobby and craft designer Howard Lamey. When Howard got me into the loop, I realized that it wouldn't take much to replicate the lithography of the original structure. I sent a sample to both Ted and Howard. Nothing happened for a bit, except that Ted thought the putty-and-dull-olive color combination of the original could stand to be a bit brighter. Editor's Note: In late 2009, Putz house collector "Papa Ted" Althof brought an old American Flyer way station to the attention of Florida hobby and craft designer Howard Lamey. When Howard got me into the loop, I realized that it wouldn't take much to replicate the lithography of the original structure. I sent a sample to both Ted and Howard. Nothing happened for a bit, except that Ted thought the putty-and-dull-olive color combination of the original could stand to be a bit brighter.
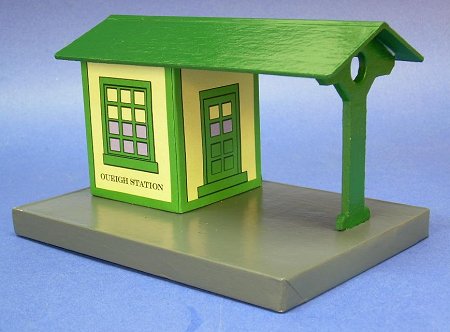
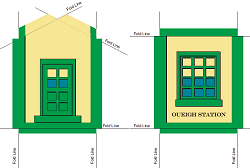
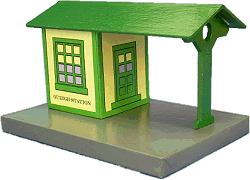 A few weeks later, Howard asked me a question about the graphics. I brightened them up as Ted had recommended, added a door, and tweaked other details to help them fit in better with our other Tribute to Tinplate structures. Then I sent the updated graphics back to Howard. He found a bit of time and started on this project in earnest. It seems like a good way to add operational interest without taking very much space at all. A few weeks later, Howard asked me a question about the graphics. I brightened them up as Ted had recommended, added a door, and tweaked other details to help them fit in better with our other Tribute to Tinplate structures. Then I sent the updated graphics back to Howard. He found a bit of time and started on this project in earnest. It seems like a good way to add operational interest without taking very much space at all.
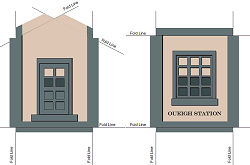
Although Howard's project photos show the updated colors, I have also made the original colors available, in case you want a more traditional look. I have also made three sizes available.
- Paul
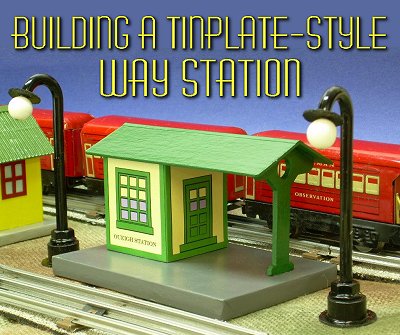
Building a Tinplate-Style Way Station
This is an easy project that was designed to look good with vintage trains. When Paul sent me the original graphic, he let me decide what size roof and platform to include, so I printed out a copy in black and white (saving my inkjet's cartridges) and made a mock-up before I began the final structure.
What You Will Need
- Clean solid cardboard, such as from cereal boxes or the backs of writing tablets. I doubled the thickness of the roof to get a more solid appearance, so you might keep that in mind.
- Corrugated cardboard for the station platform and building foundation
- A sharp mat knife or Xacto knife
- Elmer's white Glue-All. A glue stick would also come in handy.
- Several sheets of acid-free white bond paper
- Acrylic paint for the roof and platform. For the roof, I mixed a green that matched Paul's graphics. If you wanted to use dark red for the roof, that would also provide a vintage look, since several similar structures had dark red roofs.
- Access to the Internet and a color printer.
For a more comprehensive list of tools and supplies that come in handy on any cardboard house project, please refer to our article What You Need to Build Glitterhouses.
A Note about Scale
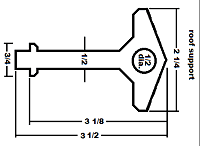
This project's size has been reduced to about S scale to look good with my Marx tinplate trains. If you want the station to look good with the bigger Lionel O gauge trains, choose the O scale plans. If you want to go with Large Scale (garden) trains or with antique Standard Gauge trains, choose the Large Scale version.
Print the Patterns
This project has a structure pattern that you will need to cut out and transfer to cardboard, as well as a graphic sheet that you will use to finish your station's appearance.
If you don't have Adobe Acrobat Reader on your computer or for some reason that doesn't work, contact
Paul and ask him for help - that's his department. :-)
A note about Copyright - However you use these plans and graphics for your personal use, please keep in mind that the lithograph graphics are copyright 2010 by Paul Race and are not to be copied, re-used, republished, or repurposed without prior permission and appropriate credit. Commercial use without prior permission is illegal and expressly forbidden.
Big Indoor Trains(tm) is a participant in the Amazon Services LLC Associates Program, an affiliate advertising program designed to provide a means for sites to earn advertising fees by advertising and linking to amazon.com. Paul likes making resources like this available to hobbyists, but they are expensive and time-consuming to produce and publish, and it's frustrating to see other folks profiteering off his hard work. In other words, if you like having this kind of resource available and you'd like to see more, please respect the creator's rights.
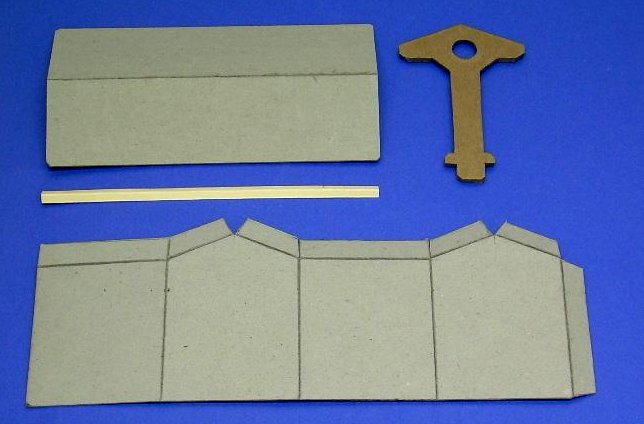
Cutting the Patterns
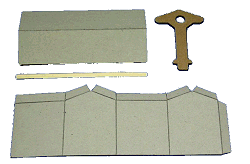 For the side walls and roof, I like to use the back of writing tablets. I always cut out and assemble the backing pieces for the walls before I mounted the graphics to them. Note that you should adjust the lateral measurements of the backing pieces so that they are slightly less than the size of the lithograph sheet.
Use a metal straightedge and fresh craft blade to score the folds before you cut the outline of the structure walls.
After you have scored and cut out the walls, glue them together and hold them with clothespins or something so they can dry while you start on the base.
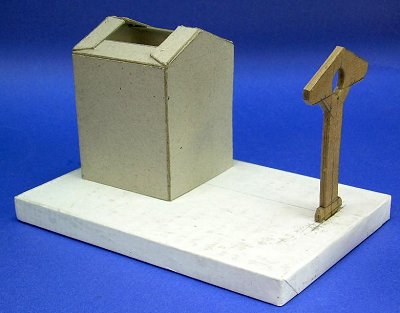
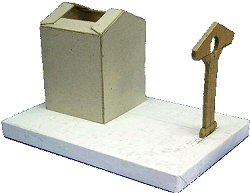
Building the Base
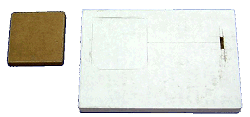 The base is a rectangular "box" built up from corrugated cardboard. The photo to the right shows the base and building foundation piece after they are mostly assembled. The base is a rectangular "box" built up from corrugated cardboard. The photo to the right shows the base and building foundation piece after they are mostly assembled.
- Make the base from three or four layers of corrugated cardboard glued together in a sandwich.
- Wrap and glue a strip of cereal-box cardboard all around it to camouflage the rough edges of the corrugated cardboard.
- When the base is built, cover it with white bond paper just like you would wrap a gift, except that all surfaces of the paper cover must be glued down to the box. A glue stick works great for this.
Note: For more information about building bases for vintage-style cardboard houses, please see our Glitterhouse Bases article.
After you have built the base, cut the foundation piece out of corrugated cardboard. Set the foundation piece loosely on the base and set the station above it to make certain it is a secure, but not overly tight fit. Don't glue anything to the base at this time, however. The main function of this piece is to help glue the station to the platform securely when it is time to do so.
 Making the Post Making the Post
I cut the post from three layers of writing tablet back, glued together. Use a sharp blade and several cuts - don't try to cut all the way through at once. I cut the hole with the kind of punch you use to cut leather. If you don't have a hole punch that will work, don't bother with a hole.
When you check the position of the station and foundation, it is critical that the center line of the station lines up with the post. When you're sure of your measurements, notch the base to give a place for the bottom of the post to be glued in. Don't glue anything down until after you've checked the fit with the roof and painted the base, though.
I painted the post to match the roof color.
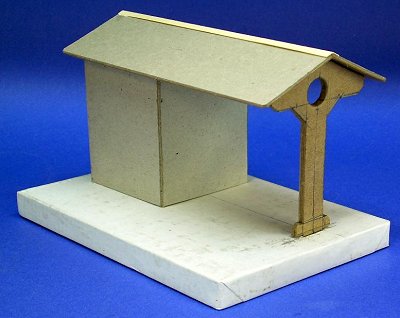
Building the Roof
I like to use at least one layer of thick cardboard from the back of writing tablets, scoring it where it should bend. Then I added a layer of cereal box cardboard to make the surface smoother, also scoring it where it should bend. For the trim piece on top, I use a strip of cereal box 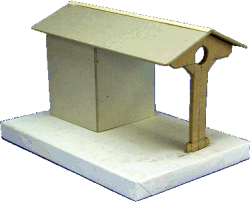 cardboard, creasing it carefully before attaching it. cardboard, creasing it carefully before attaching it.
Make certain that as the glue dries, the roof stays bent at the correct angle to fit over the structure properly.
There is no printing on the original, so I finished the roof by priming, then painting it with several layers of paint mixed to match the green of the walls.
Painting the Base
Once you're certain of the fit, prime the base and paint it with several coats of glossy paint in the color of your choice. Industrial gray was the color most often chosen for this kind of structure in the tinplate days.
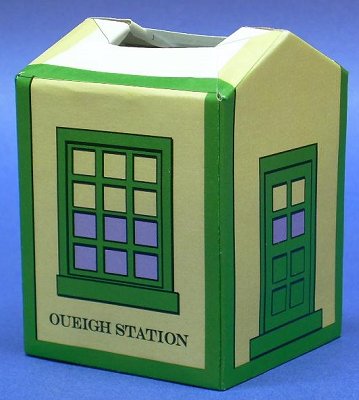
Apply the Graphics
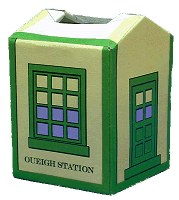
- Apply the printed graphics. Only do a section at a time. Measure carefully, make crisp folds, apply glue and press in place.
- Trim the edges of the graphic paper, if necessary. The easy part of building this structure is that you don't have to do anything with the window and door frames. The hard part is getting the corners to line up exactly.
- After the graphic sheets have dried in place, you will see white edges at the corner. With a felt-tip pen, marker, or acrylic paint and a very tiny brush, carefully coat just the edge of the paper or card stock.
Wait until the glued-on graphics are thoroughly dry, then spray the station body with several light coats of a clear glossy indoor/outdoor acrylic finish. This protects it somewhat from moisture and dust and also helps reduce fading. Do not such a heavy coat in one pass that you cause any streaks, runs, or drips, though, or you'll have to start over.
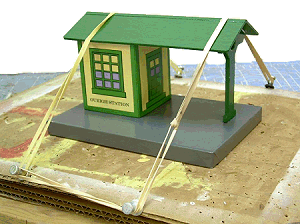
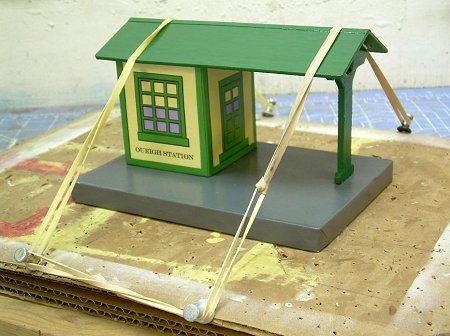
Gluing Together
To make certain that all the building pieces aligned, I glued the station and post to the base at the same time, made sure the roof fit over them properly, and used some rubber bands to hold everything in place until it dried overnight. By morning, the structure was very solid.
Finish
When the glue was completely dry, I added another couple of light coats of acrylic spray for good measure. However it won't soak in anywhere on the structure by now, so be careful to keep your coats light.
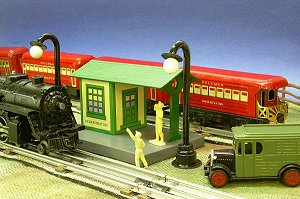 Of course, the station will really come to life when you add figures, accessories, and trains suited to the period you are trying to portray. Of course, the station will really come to life when you add figures, accessories, and trains suited to the period you are trying to portray.
Conclusion
If you like this project, stay in touch - more are on the way. In the meantime, you might like to take a look at the following projects.
 More "Tribute to Tinplate" Articles
Here's our summer, 2009 "Blockbuster," a series of projects that pay "Tribute to Tinplate," based on the tinplated-steel trains and towns of a century ago. Free downloadable commercial-grade graphics and instructions will help you inexpensively add an authentic vintage look to any indoor railroad. Most projects have multiple pre-scaled plans and graphics, plus scalable graphics for the smaller scales, so you can easily add a vintage look to ANY railroad or holiday village, no matter what size your trains and towns are. We have more on the drawing board, so be sure and check back. More "Tribute to Tinplate" Articles
Here's our summer, 2009 "Blockbuster," a series of projects that pay "Tribute to Tinplate," based on the tinplated-steel trains and towns of a century ago. Free downloadable commercial-grade graphics and instructions will help you inexpensively add an authentic vintage look to any indoor railroad. Most projects have multiple pre-scaled plans and graphics, plus scalable graphics for the smaller scales, so you can easily add a vintage look to ANY railroad or holiday village, no matter what size your trains and towns are. We have more on the drawing board, so be sure and check back.
- Building a Vintage Tin-Style Cottage
 This project is inspired by a popular pre-war tinplate house that was made to go with standard gauge trains, like the early 1900s-era Ives and Lionel. Our own commercial-quality graphics and instructions, as well as Howard Lamey's plans and assembly details are all free, to give your railroad a vintage tinplate look with a few cents' worth of materials. Many options are available, and most graphics and plans can be downloaded directly from the article. New, July, 2009! This project is inspired by a popular pre-war tinplate house that was made to go with standard gauge trains, like the early 1900s-era Ives and Lionel. Our own commercial-quality graphics and instructions, as well as Howard Lamey's plans and assembly details are all free, to give your railroad a vintage tinplate look with a few cents' worth of materials. Many options are available, and most graphics and plans can be downloaded directly from the article. New, July, 2009!

-
Building a Vintage Cape Cod House - Round out your community with this variation on the cottage above. An easy, but charming "Tribute To Tinplate" structure that looks great with our other projects but will stand fine on its own as well. Includes free plans, graphics, and instructions. Click on the photo for more information. New, February, 2010!
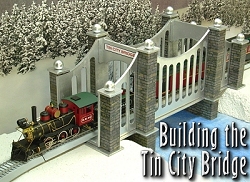 Building the Tin City Bridge -
Add an eye-popping feature based on the classic Lionel Standard Gauge bridges. Works great with collectible villages, vintage O and S-gauge trains, On30 trains and more! Free downloadable plans, graphic files, and step-by-step instructions are provided. Building the Tin City Bridge -
Add an eye-popping feature based on the classic Lionel Standard Gauge bridges. Works great with collectible villages, vintage O and S-gauge trains, On30 trains and more! Free downloadable plans, graphic files, and step-by-step instructions are provided.
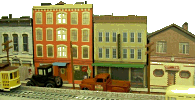
 Building TinPlate-Syle Store Fronts -
Not one, but three buildings! The West Brothers tinpated candy boxes saved money by using one plan with multiple sets of graphics to get maximum use out of their pattern expense. We've followed their example with projects inspired by three of their most popular buildings. Use our free downloadable patterns and plans to add a vintage-style business district on your railroad or display village. Building TinPlate-Syle Store Fronts -
Not one, but three buildings! The West Brothers tinpated candy boxes saved money by using one plan with multiple sets of graphics to get maximum use out of their pattern expense. We've followed their example with projects inspired by three of their most popular buildings. Use our free downloadable patterns and plans to add a vintage-style business district on your railroad or display village.
 Building a Tinplate-Inspired Lamp Post The ideal accessory for the Lewis Park Station, or any station or city hall on your railroad or holiday village. No, they don't actually light, but they are cheap and easy to build and add a great deal of vintage interest to any setting. Free downloadable plans are available in several scales. Building a Tinplate-Inspired Lamp Post The ideal accessory for the Lewis Park Station, or any station or city hall on your railroad or holiday village. No, they don't actually light, but they are cheap and easy to build and add a great deal of vintage interest to any setting. Free downloadable plans are available in several scales.
 Building a Vintage "Lithograph" Station Building a Vintage "Lithograph" Station  New
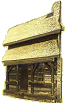
Feature - Building a Tinplate-Inspired Watchman's Shanty Back in the day before automated crossings, these were common sites alongside busy rail crossings. Howard's exclusive design pays tribute to a series of tinplate structures that go back a hundred years and include three different scales. His free plans and instructions will help you dress up any indoor railroad or holiday village. New
Feature - Building a Tinplate-Inspired Watchman's Shanty Back in the day before automated crossings, these were common sites alongside busy rail crossings. Howard's exclusive design pays tribute to a series of tinplate structures that go back a hundred years and include three different scales. His free plans and instructions will help you dress up any indoor railroad or holiday village.
 New
Feature - Building a Tinplate-Inspired Railroad Crossing Sign This is the ideal accessory for the Watchman's Shanty project. Based on a series of products that are now available only as expensive collector's items, this easy and almost-free project will add texture, interest, and period to any model railroad or holiday village. New
Feature - Building a Tinplate-Inspired Railroad Crossing Sign This is the ideal accessory for the Watchman's Shanty project. Based on a series of products that are now available only as expensive collector's items, this easy and almost-free project will add texture, interest, and period to any model railroad or holiday village.
- Easy Street Scene - This new
 building project uses downloadable building graphics and a little cardboard or foam board to build up a convincing downtown scene that is only a few inches deep - perfect for shelf layouts, tight spots, and dioramas. We also provide links to high-resolution graphics that will work for any scale. building project uses downloadable building graphics and a little cardboard or foam board to build up a convincing downtown scene that is only a few inches deep - perfect for shelf layouts, tight spots, and dioramas. We also provide links to high-resolution graphics that will work for any scale.

 Build a Vintage-Style Cardboard Stone Cottage - This building project is made like the vintage cardboard houses folks used to set around their Christmas tree in the early 1900s (before glitterhouses became common), but its design was inspired by a building that shows up on the "Isle of Sodor." The building uses free downloadable graphic paper to put a realistic stone veneer on an old-world cottage and fence. It works with Christmas villages, or with a little customization, would dress up any indoor railroad. A "brick cottage" option is also shown.
 Log Cabin Building Flat - This "building flat" uses downloadable graphics and foam board or cardboard to dress up a narrow corner of your railroad or village. The techniques in this project can be used for almost any kind of building you want to represent in a tiny space. December, 2007 Log Cabin Building Flat - This "building flat" uses downloadable graphics and foam board or cardboard to dress up a narrow corner of your railroad or village. The techniques in this project can be used for almost any kind of building you want to represent in a tiny space. December, 2007
- Build a Vintage-Style Barn and Silo - This
 building project uses downloadable graphics to put realistic shingles and siding on an old barn and silo. Like the stone cottage above, it works with Christmas villages, or with a few changes, it would dress up an indoor railroad. building project uses downloadable graphics to put realistic shingles and siding on an old barn and silo. Like the stone cottage above, it works with Christmas villages, or with a few changes, it would dress up an indoor railroad.
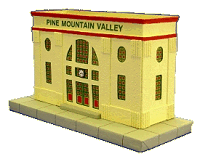 Building the Union Station - This original project by designer Howard Lamey is inspired by two traditions - the cardboard Christmas houses that were popular in US homes between 1928 and 1965 and the Lionel station that was popular for most of the 20th century. Building the Union Station - This original project by designer Howard Lamey is inspired by two traditions - the cardboard Christmas houses that were popular in US homes between 1928 and 1965 and the Lionel station that was popular for most of the 20th century.
Other Articles about cardboard houses include:
To Return to the BIG Indoor Trains(tm) Primer Page, click here.
|


|


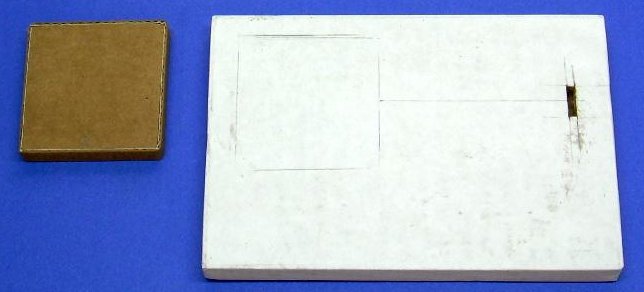 The base is a rectangular "box" built up from corrugated cardboard. The photo to the right shows the base and building foundation piece after they are mostly assembled.