 | |||
 |  |  |
 |  |
 |  | ||
 |  | ||
 |  | ||
for Big Indoor TrainsTM |
|
|
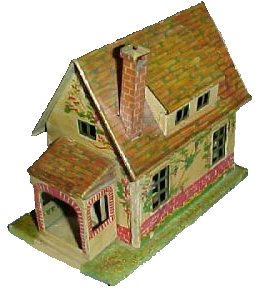
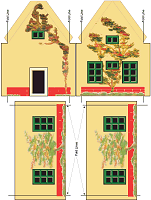
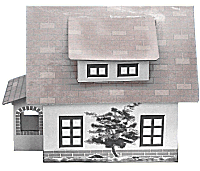
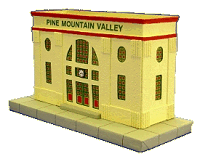
Like the A photo of the original structure that inspired this project is shown at the left. I'll try to get a better photo next time I see one at a train show. Although a person good with tools could use our plans and graphics to build our "Tribute to Tinplate" structures from sheet tin, we show how to do it with cardboard. Ironically, this reflects yet another tradition - when tinplate trains and towns were in vogue, Japanese companies manufactured heavily-shellacked cardboard houses and stations that you could use to supplement your tinplate empire. Today's putz house collectors call these old Lionel and Ives-inspired cardboard houses "Lackies," because of the lacquer that made them almost as shiny as the metal structures that inspired them.
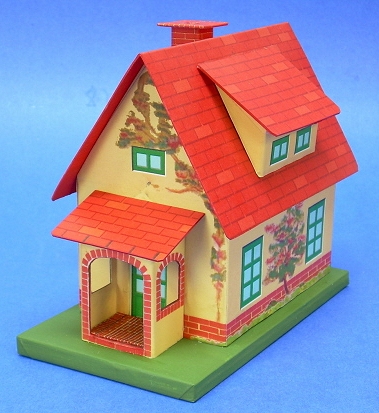
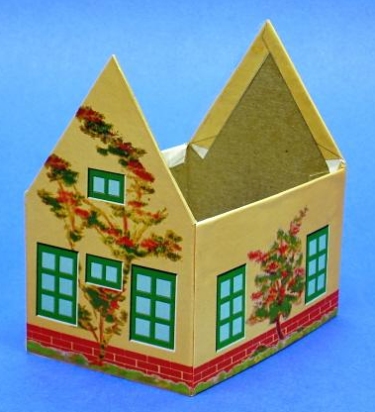
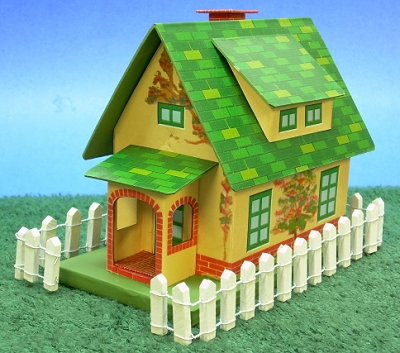
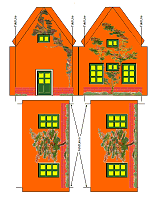
Building a Vintage Tin-Style CottageThis project was designed to look good with vintage trains. When Paul sent me the original graphic, he gave me many options to choose from, including different roof colors. We also negotiated a little about the way I wanted to do the windows. The end result is that there are several different ways to build this project, and Paul about lost his mind trying to sort them all into an article that still made sense. But this way, you have almost as many choices as I did when I started building my cottage, and you can make a totally unique version if you wish.Here's an example: Paul's original idea was to reproduce the "recessed" windows of the original by cutting out the windowframes on the building walls and gluing more windowframes in behind them. But I wanted to use a "one-piece" solution for the walls. I also wanted to have blue windowpanes like the Lewis Park Station. So Paul relented and made a version with blue windowpanes. Since there wasn't going to be any cutting out on the blue-window version, Paul also provided "Trompe d'Oeil" shading on the door and windowframes to provide a more three dimensional look. (For more about "Trompe d'Oeil" shading, see Paul's "blog-like article" Pay No Attention to that Man Behind the Curtain.)
What You Will Need
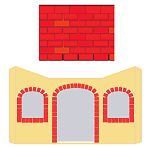
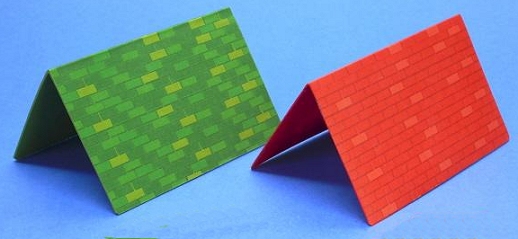
A Note about ScaleMany early O-gauge and O27 trains are more like toys than models, so the "scale" of the trains and accessories are all over the map. A few pieces even are closer to HO (1:87) in scale than they are to O (usually 1:48). On the other hand, some accessories made to go with O27 trains are half again as large as they should be, since they're holdovers from earlier Standard Gauge products. So if you want your tinplate-inspired projects to look right with your existing equipment, you probably want to do a "mockup" first, as I did. Choose the scale you feel mostly likely to prefer, and print out a copy of Paul's graphics for that scale in black and white (saving your color cartridges). Then cut and fold the printout to make a mockup you can set next to your trains and other accessories before you begin the final structure.Because the blue-window version I chose doesn't require a lot of window-frame cutting, my mockup went together pretty fast. I decided that the O scale version looked a little too big next to my Marx equipment. So I used the S scale graphics, which are about 75% as big. But then my O scale people looked silly near the porch, so I used an O scale porch. If you're using later Lionel, which is bigger than my Marx tinplate trains, you might prefer the O scale building and porch. By the way if you want a larger version to go with standard gauge or large scale trains, contact Paul and tell him whether you want the classic or blue-window version. Or you might be able to print the S-scale graphics at 2X on a large format printer. But those files are just too big to host permanently. Print the PatternsThis project has a structure pattern that you will need to cut out and transfer to cardboard, as well as graphic sheets that you will use to finish the building's appearance. Again, doing a mock-up to make certain the finished structure will look right with your existing equipment is very important.You may print the structure pattern on any sort of paper, since you're simply using this to transfer the plan to your cardboard medium. However the "lithograph" graphic should be printed on acid-free heavy paper or card stock. For a more "authentic" result, you might consider printing out the "classic" versions with the black window panes, then cutting out the windowframes in the building's side, and gluing the other window frames in from the back to give the "inset" effect of the original. On the other hand, you may prefer the blue window frames and fake shadows that are shown in the title photo. Sound confusing? Sorry. Once Paul does up a graphic he thinks folks might find useful, he tries to make it available. You may find it helpful to know that, the text links in bold will download the files used in the project as it was photographed for this article. Note: Some of these graphics are so large that for the O scale version we had to split them into two files. If you're working on an O scale structure, and you can't find one of your printouts, please doublecheck to make certain you printed each O scale file. For Optimum Printing - We have used professional "vector" graphics when possible to make certain that you get the highest resolution graphic, whatever scale you use. In most cases, you can get the best result by right clicking on the text name of the graphic you need, then saving the pdf file to your hard drive. That way you won't have to download the file again if you accidentally print the plans or graphics the wrong size, which is easy to do with some printers. Then navigate to the folder with the graphics and click on the file name. Adobe Acrobat Reader should open up. Make certain that the graphic is set to print at 100% and that "scale to fit" or some such option is not checked. More information about verifying the correct size of your printed graphics and plans is listed under the "Building a Mockup" section below. Structure PatternsGraphic FilesIf you can't get the graphics to work the way you need them to, contact
Paul and ask him for help - that's his department. :-)
A note about Copyright - However you use these plans and graphics for your personal use, please keep in mind that the lithograph graphics are copyright 2009 by Paul Race and is not to be copied, re-used, republished, or repurposed without prior permission and appropriate credit. Commercial use without prior permission is illegal and expressly forbidden.
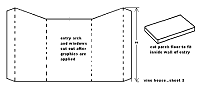
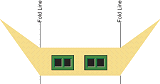
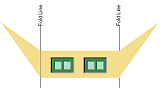
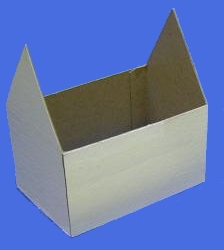
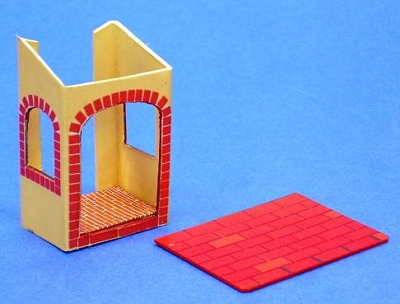
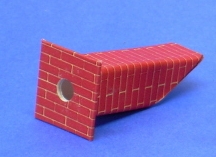
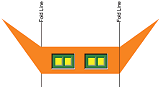
Building a "Mockup"You will save time and sanity in the long run if you print the graphics in low-res B&W first to make certain that the are the right size for the plans you have printed out and that they are the right size to go with the rest of your equipment.First, make certain that the plans you have printed are the same size as the graphics you have printed. Sadly, it is very easy to download all the right graphics, then click the wrong button (such as "fit to page") when you go to print. Worse yet, a few printer drivers make all of those decisions for you unless you click on the "advanced" button or some such. As silly as this step may sound, use cheap paper to print the plans, then print the graphics in draft mode in black and white (to save toner cartridges). You can try holding both sheets up to the light, but sometimes it's hard to get a complete "picture." Remember, when you score and fold the frame pieces, the actual structure should be a bit wider in each direction than the pieces you cut out, because you need to compensate for the thickness of the cardboard you are using. Paul's wall graphics extend the wall pattern beyond the fold lines to compensate for any minor differences, but don't count on that compensating for any major discrepancies. The best way to be sure you have plans in the same scale as your graphics is to fold the graphics along the fold lines, then cut them out and hold up to the frame pieces. Again, the frame should be slightly smaller, especially horizontally. If it isn't you should adjust the size when you transfer the plans to the card stock. Then while you have the cheap printout cut out anyway, tape or glue it together and set it alongside the stuff you already have to be sure it's the size you want. If not, select a different scale and try again. Cutting and Scoring the Frame Pieces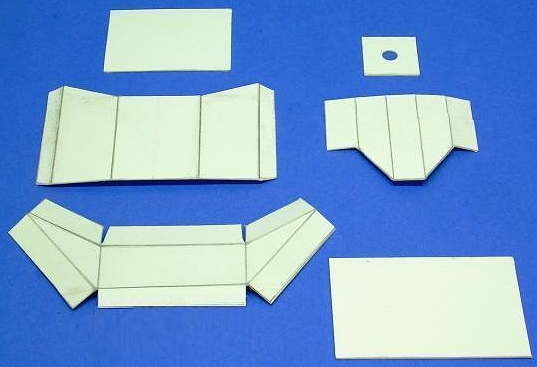 Transfer the plans you have chosen to appropriate pieces of cardboard. In most cases, a thick, solid piece like the back of a writing tablet is best. Using a Xacto-type knife and a straight edge, carefully score every place where a fold is indicated. Then cut the pieces out. As an example, the dormer, porch, and chimney pieces in the photo to the left have been scored and cut out. Transfer the plans you have chosen to appropriate pieces of cardboard. In most cases, a thick, solid piece like the back of a writing tablet is best. Using a Xacto-type knife and a straight edge, carefully score every place where a fold is indicated. Then cut the pieces out. As an example, the dormer, porch, and chimney pieces in the photo to the left have been scored and cut out.
|
|||||||||||||||||||||||


 Mismatched sizes between graphic and plans is a problem that is much easier to head off than it is to solve once you've cut out the building frame.


 |
 |
 |
|
|
||
 |
 |
 |
| |
 |
If you can't get the graphics to work the way you need them to, contact Paul and ask him for help - that's his department. :-)
Conclusion
If you like this project, stay in touch - more are on the way. In the meantime, you might like to take a look at the following projects. Cape Cod This is a simpler version of the tin house on this page, inpired, in part, by the Plasticville Cape Cod.
 Building a Vintage "Lithograph" Station
Our first "Tribute to Tinplate" article pays tribute to the lithographed stations of a century ago. Free downloadable commercial-grade graphics and instructions are available in several scales. Instructions for building this project inexpensively from scrap cardboard are also included, although you could build it from tin if you really wanted to.
Building a Vintage "Lithograph" Station
Our first "Tribute to Tinplate" article pays tribute to the lithographed stations of a century ago. Free downloadable commercial-grade graphics and instructions are available in several scales. Instructions for building this project inexpensively from scrap cardboard are also included, although you could build it from tin if you really wanted to.
 New
Feature - Building a Tinplate-Inspired Lamp Post The ideal accessory for the Lewis Park Station, or any station or city hall on your railroad or holiday village. No, they don't actually light, but they are cheap and easy to build and add a great deal of vintage interest to any setting. Free downloadable plans are available in several scales.
New
Feature - Building a Tinplate-Inspired Lamp Post The ideal accessory for the Lewis Park Station, or any station or city hall on your railroad or holiday village. No, they don't actually light, but they are cheap and easy to build and add a great deal of vintage interest to any setting. Free downloadable plans are available in several scales.
 New
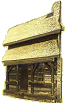
Feature - Building a Tinplate-Inspired Watchman's Shanty Back in the day before automated crossings, these were common sites alongside busy rail crossings. Howard's exclusive design pays tribute to a series of tinplate structures that go back a hundred years and include three different scales. His free plans and instructions will help you dress up any indoor railroad or holiday village.
New
Feature - Building a Tinplate-Inspired Watchman's Shanty Back in the day before automated crossings, these were common sites alongside busy rail crossings. Howard's exclusive design pays tribute to a series of tinplate structures that go back a hundred years and include three different scales. His free plans and instructions will help you dress up any indoor railroad or holiday village.
 New
Feature - Building a Tinplate-Inspired Railroad Crossing Sign This is the ideal accessory for the Watchman's Shanty project. Based on a series of products that are now available only as expensive collector's items, this easy and almost-free project will add texture, interest, and period to any model railroad or holiday village.
New
Feature - Building a Tinplate-Inspired Railroad Crossing Sign This is the ideal accessory for the Watchman's Shanty project. Based on a series of products that are now available only as expensive collector's items, this easy and almost-free project will add texture, interest, and period to any model railroad or holiday village.
- Easy Street Scene - This new
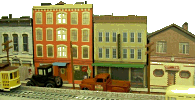 building project uses downloadable building graphics and a little cardboard or foam board to build up a convincing downtown scene that is only a few inches deep - perfect for shelf layouts, tight spots, and dioramas. We also provide links to high-resolution graphics that will work for any scale.

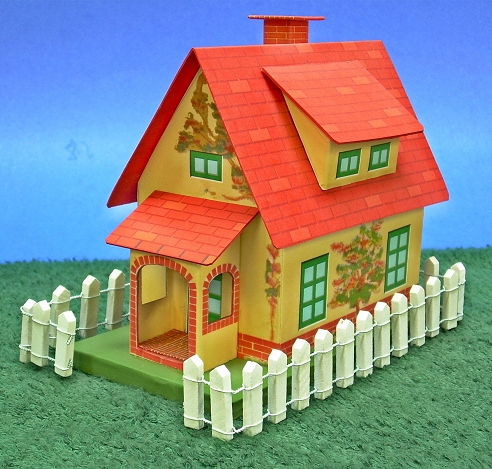
 Build a Vintage-Style Cardboard Stone Cottage - This building project is made like the vintage cardboard houses folks used to set around their Christmas tree in the early 1900s (before glitterhouses became common), but its design was inspired by a building that shows up on the "Isle of Sodor." The building uses free downloadable graphic paper to put a realistic stone veneer on an old-world cottage and fence. It works with Christmas villages, or with a little customization, would dress up any indoor railroad. A "brick cottage" option is also shown.
 Log Cabin Building Flat - This "building flat" uses downloadable graphics and foam board or cardboard to dress up a narrow corner of your railroad or village. The techniques in this project can be used for almost any kind of building you want to represent in a tiny space. December, 2007
- Build a Vintage-Style Barn and Silo - This
 building project uses downloadable graphics to put realistic shingles and siding on an old barn and silo. Like the stone cottage above, it works with Christmas villages, or with a few changes, it would dress up an indoor railroad.
 Building the Union Station - This original project by designer Howard Lamey is inspired by two traditions - the cardboard Christmas houses that were popular in US homes between 1928 and 1965 and the Lionel station that was popular for most of the 20th century.
Other Articles about cardboard houses include:
- Building a Glitterhouse - A detailed primer on building your own vintage Christmas cardboard houses.
- LittleGlitterHouses.com, Howard Lamey's own site about glittered cardboard Christmas houses, featuring many he designed himself.
- Building a Vintage-Style Cardboard Halloween House
To Return to the BIG Indoor Trains(tm) Primer Page, click here.


|

|  |
 |
 |  |  |
Note: Family Garden TrainsTM, Big Christmas TrainsTM, Big Indoor TrainsTM, Big Train StoreTM, and Trains-N-TownsTM are trademarks of Breakthrough CommunicationsTM (www.btcomm.com). All information, data, text, and illustrations on this web site are Copyright (c) 1999, 2000, 2001, 2002, 2003, 2004, 2005, 2006, 2007, 2008, 2009, 2010, 2011, 2012, 2013, 2014, 2015 by Paul D. Race.
Reuse or republication without prior written permission is specifically
forbidden.
Big Indoor Trains(tm) is a participant in the Amazon Services LLC Associates Program, an affiliate advertising program designed to provide a means for sites to earn advertising fees by advertising and linking to amazon.com.
For more information, contact us.
 |  |
